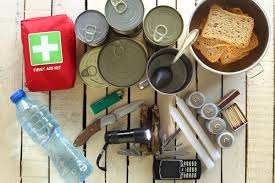
Create a 72 hour emergency food kit for under $10!
The unthinkable can happen when we least expect it. Whether it’s a natural disaster, political instability, or a viral outbreak, we can’t always rely on our governments or the good will of others to ensure our safety and that of our loved ones.
Everyone wants to be in the best position to protect themselves and their families in a time of crisis. But where should you start?
And how can you do it without overspending? For starters, stay ahead of the game and protect your family by making a good plan.
Part of this plan should be pulling together an easy and personalized 72-hour Emergency Food Kit to include in your Bug Out Bag without putting a dent in your budget.
Furthermore, if you need to leave your home unexpectedly, this portable, do-it-yourself kit can be a life saver. It’s easy to make, reasonably light, and environmentally friendly, utilizing recycled milk cartons to carry your food.
There is no shortage of pre-made, pre-packaged emergency food kits available online, but most of these will cost you. A quick glance at Amazon’s stock will reveal a variety of prepackaged 72 hour kits, but most of these tend to run in the $40+ range, not always the best option for those of us on a super tight budget, especially considering that these kits won’t stay fresh forever.
So, if you want to put together your own emergency kit on the cheap, while maximizing your basic nutrition and portability, where’s the best place to start?
Never Forget the H20!
First and foremost, never forget your water supply. Two-liter pop bottles make for a good rationing size. To keep everything together, you can attach it to a milk carton with duct tape.
Depending on where you live and whether or not you may find yourself near a river, stream, or other body of water, it may be worth investing in a portable water filter as well. It’s important to know how to purify your water (You can read my other post: How To Purify Water: Important Survival Tips You Need To Know.)
Never drink directly from a water source, unless you want to risk a three day diarrhea. and severe dehydration when there may be no medic around.
People think you need to stash gallons and gallons, but a filter carries better and means as long as you have access to running water, your supply is nearly unlimited.”
Will Egensteiner of Outside Magazine, speaking to the New York Times in 2017.
These things can be particularly useful if you don’t know exactly how long you might be stuck away from home. But if you do choose to pack along a filter, it will unfortunately more than double your budget. The cheapest but reliable collapsible portable filter is built into a wine bottle sized carrier for about $20 on Amazon (see product below).

Aim for Long Shelf Life in Your 72 Hour Emergency Food Kit
When putting together an emergency food kit, you may choose to select items with multi-year shelf life. Canned foods or pickled vegetables will always last longer than plastic packaged items, sometimes upwards of ten years or more!
Additionally, if your aim is also to have on hand multiple kits for the whole family that can stay light (particularly important in an emergency situation in which you may need to move quickly), dehydrated foods like dried fruits are a great option.
Freeze dried foods, on the other hand, are better than their dehydrated counterparts since they reconstitute faster, retain a better texture and color, and preserve most of the original flavors. They also last longer than dehydrated foods, with some freeze dried items still being good to eat after a couple of decades or so.
But buying freeze dried foods or investing in a freeze dryer can put a huge dent in your budget. Unfortunately there aren’t many freeze dryer manufacturers right and the technology is relatively new. You can check out the best freeze dryers and approximate prices in our related post: Freeze Dryer for Sale – Best Places To Buy One.
Fortunately, our kit suggestions below aim for the right balance of shelf life, nutrition, and cost. This means that with an emergency 72 hour food kit that you create on a budget, it’s unrealistic to invest in products products that will last for 25 years.
We recommend setting up a rotation schedule to keep the items fresh. Set a time once a year to replace the items in your emergency kit. Be sure to record the assembly date somewhere on the outside of the carton. Keep in mind that individual storage conditions may vary.
In order to extend your emergency food supply kit’s rotation time, try setting aside the dry supplies for each individual day and put them in a FoodSaver bag.
Lastly, you also want to be mindful of how you pack your items to keep the kit light and minimize bulk. Minimal bulk is important when considering that you want a pack that you can easily move around or throw into a bag on the go.
Preparing Your DIY Emergency Food Kit

Remember, these are survival items – you will not get to eat until you are stuffed, nor should you expect a gourmet dining experience – but if you need to leave home in an emergency, this survival kit will work wonders in a pinch and provide the necessary nutrients to keep you on your feet.
To maintain a good rationing of your items, cut out the list and menu and place it inside your completed 72 hour emergency kit to help you prepare meals and remind you what the kit contains. If waterproofing is necessary, slip it inside a ziploc bag.
The approximate cost of each kit is $6 to $10. Buying in bulk will definitely keep the cost down, as will ordering online.
This kit needs HOT water to work, so consider what steps you’ll need to take to prepare your food after having left your room. How will you heat your water? If you’re willing to add some bulk to your kit, a collapsible, portable water boiler can be found online for under $20.If you decide to go with foods that don’t require heat, what can you substitute for the soup, apple cider, and hot chocolate? Some suggestions include protein bars, more prepackaged beef, chicken, or turkey jerky, and granola bars.
If you’re going with foods that will require hot water, there are a few things to think about adding to your kit:
- What pan will you use to cook your soup in?
- What type of surface will you eat on? Do you need plates and cups in this 72-hour emergency food kit?
- What about knives, forks, or spoons?
- For chopstick enthusiasts, this lightweight reusable chopstick carrier case is a must for your kit.
Find some more ideas on our Pinterest Board – Off Grid Cooking. Write the answer to these questions next to the foods listed below and make sure you have them packed in your final 72-hour kits.
Related Post: See our previous post – 72 Hour Kits, Food and Water
Instructions for your 72-hour Emergency Food Kit
- Wash and air dry the milk cartons completely.
- Put the cans into the cartons first,
- Add the drink and soup packets diagonally.
- Stuff the granola bars, gum, jerky, trail mix, and fruit rolls in around the cans.
- Tuck the gum and candy in the gaps wherever you can get them.
This requires some careful packing, but it does fit. The crackers will probably be crushed, but they are going in your soup anyway!
When the carton is packed full, write a list of supplies needed (pans, etc.) on the back of the menu, and put a copy of the menu inside the box.
Staple the top or tape it down, then tape the top with duct tape and strap the water filled, soda pop bottle to the side of the carton with the duct tape.
Tape a copy of the contents to the front and record the assembly date. Your kit is now complete.
These days, more and more of us have become vegetarians, be it for personal, political, or health reasons. In order to make this kit vegetarian friendly, replace the beef jerky with vegan jerky. Keep in mind, however, vegan products unfortunately tend to cost you a fair bit more than dried or cured meat equivalents.

Not seeing enough calories in this list? Then think about adding one or two Clif bars to each of your 72 hour emergency food kits. As they’re packed with vitamins, filled with protein, and with good tasty varieties that don’t take up much space, Clif bars are always a great addition.
If you want to add some more calories to this list and don’t mind dropping a few extra bucks, you can purchase a 16 count variety pack for about $18 online. Each bar packs in a whopping 240 calories, so you can break them into halves or even quarters in extreme circumstances.

Materials needed per person/per kit:
- 1 two liter pop bottle filled with water
- 1 half gallon milk carton or similar sized container (the lighter the better)
- Food items listed below
- Duct Tape
Food Items:
- 2 packs of chewing gum
- 2 packets hot chocolate mix
- 1 ½ cups trail mix or small package peanuts
- 2 sticks beef jerky (for the vegetarian option, considering replacing the beef jerky with vegan jerky).
- 1 small can fruit or apple juice
- 2 packets apple cider instant mix
- 1 two-liter pop bottle filled with water
Date packed:
- 13 pieces hard candy
- 2 fruit roll ups
- 3 packages soda crackers
- 1 can hearty soup (pop top)
- 2 instant soup mix packages
- 4 granola bars
Breakfast Day 1:
- 2 granola bars
- 1 can fruit or apple juice
Lunch:
- 1 package soup mix (or noodles)
- 1 package soda crackers
Dinner:
Snacks:
- 4 pieces candy & 3 sticks gum
Breakfast Day 2:
- 3/4 of the trail mix
- 1 hot chocolate
Lunch:
Dinner:
- 1 canned soup variety
- 1 package soda (or cheese) crackers
Snacks:
Breakfast Day 3:
- 3/4 of the trail mix
- 1 apple cider
Lunch:
- 1 package soup mix (or noodles)
- 1 package soda crackers
Dinner:
- 2 granola bars
- 1 fruit roll
- 1 hot chocolate mix
Snacks:
- 4 pieces candy & 3 sticks gum
Other Suggestions for Making the Most out of a DIY Emergency Food Kit
These food options have all been selected based on their low mass, high nutritional value to size ratio, and relatively low price and easy availability. However, some of these items may vary in cost and availability depending on where you live. So adjust accordingly.
Be sure to keep in mind how best to maximize your nutrition so that you and your family have the energy and sustenance to stay fit and healthy even under stressful and even dangerous conditions.
Also, if you’re looking for items to replace suggestions here that are unavailable in your local stores, try aiming for the highest level of vitamins and protein.
At the same time, avoid foods containing too much sugar or harmful ingredients like high fructose corn syrup. These foods will only cause sudden spikes and drops in blood sugar levels also known as sugar crashes which will prompt you to eat more than you normally would, which is highly counterproductive when food is scarce.
In conclusion, if you plan on being held up in one place to ride out an emergency, such as an illness outbreak that requires quarantine, it will be essential to also do some research on the best ways to properly store food that will get you through the hardest of times.
Disclosure: This post contains affiliate links. Buying anything through said links may earn us a small commission at no extra cost for you. Thank you for supporting PreparednessMama in this way!
You may also be interested in

Preparedness Mama and its collaborators have created a one-stop shop of critical resources for families looking to prepare for disaster. We know firsthand that getting ready for the worst with a big family poses some particular challenges.
We’ve learned from the past so that you don’t have to make the same mistakes again. Fear of the unknown is one of the scariest things in life, but we hope that Preparedness Mama’s treasure trove of practical advice will make that unknown less daunting and ultimately help take the scared out of being prepared for every single one of our readers.


Leave a Reply